When you buy an MTB there are probably 3 things that stand out as more important than the rest. Firstly, it should be the right type of MTB for your type of MTB riding. Secondly, it should be the right size. And thirdly, both of those points are wasted if you aren’t set up on the bike correctly.
Although there are multiple elements involved in a complete bike setup, in this article we will be looking at the seat height and position. We see many newcomers to mountain biking struggling because their seat height and position is affecting their ability to get the right body position on the bike.
For styles such as Downhill, Gravity Enduro and Dirt Jump, a lower seat height is necessary. This is for ease of changing your body position, and also avoiding the dreaded bashing of one’s special bits and ending up rolling around on the ground crying like a little girl whether you are one or not. However, for Cross Country and Trail riding where efficiency on climbs and along flat sections is important, a higher seat position is needed for most of the riding you’ll do.
For the purposes of this article, we are going to assume your bike is right size for you and other elements of setup are at least within grasp of being correct. If you have a dropper post, make sure it is fully extended before beginning adjustment. A dropper post is one that allows the seat height to drop down with the flick of a lever. Even dropper posts though need to be setup at the maximum height correct for you, therefore the seat height measurement will be the same for either post. So here we go.
The theory
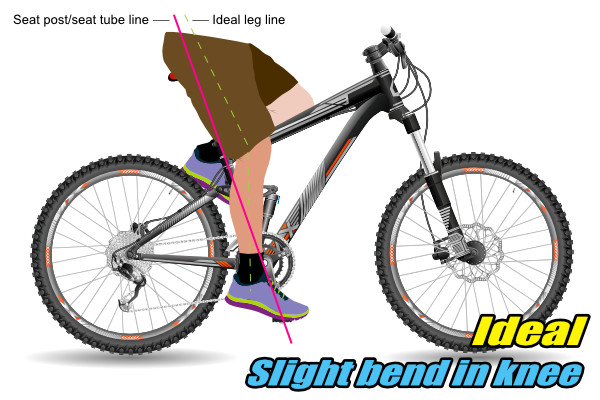
When riding, you should have a slight bend at the knee when your crank arm is in-line with your seat tube. You don’t want your knee extending out too far or your hips rolling side to side as you pedal along. If this is happening then your seat is likely to be too high. If not high enough though, the power left at the bottom of your leg stroke is lost and a smooth pedalling action is difficult to attain. Smooth pedalling is not only more energy efficient but on climbs. it’s puts less pressure on your muscles and it lessens the likelihood of the rear wheel losing traction as well. This is because your butt, not just your legs support your weight on the bike, leaving your legs free to turn with better technique.
The best setup is a professional setup
Without doubt, having someone who is proficient in bike setup is the best way to go. Many bike shops have professional bike setup stations that will get you correctly positioned on your bike. If you can afford to this, even once, then you are taking a good step towards better and safer riding.
Do it yourself
Getting the height close
There are some complex systems out there for getting the seat height right for cycling but most newcomers are not going to want to be applying formulas to body measurements to accomplish this. For those wanting to get their seat height somewhere near correct the following procedure will help.
Sit on your bike while on flat ground and wearing the shoes you will be riding in. Obviously, you’ll need to hold onto or lean against something. It’s helpful to have a mate to help so they can see what’s going on and get this more accurate. Place the heel of both shoes on the pedals, rotate your pedals backwards to get to the bottom of the stroke (pedals at 12 and 6 ‘o’clock). Your knee should be relaxed and your leg should be straight. Remember relax, don’t push or strain. Do a few rotations backwards, you shouldn’t feel your hips rocking or as though your knees are locking as you pedal.
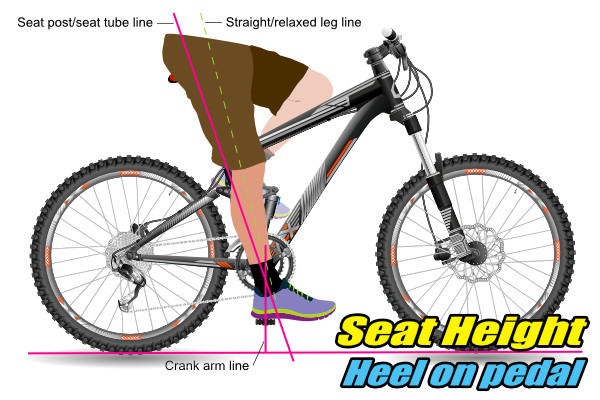
Now when you put your foot back into the normal position on the pedal you’ll have a nice slight bend in your knee for maximum power transfer. The normal position should place the ball of your foot over the pedal axle. If this new position is much higher than before, then if necessary, take a measurement so you can get it back where it is now, and then lower the seat height a little until you are used to that. Don’t go more than a centimetre or so lower though, better to feel a little uncomfortable for a ride or two than to keep using a seat height that is totally incorrect. Personally, I recommend finding the height with this technique and then dropping the seat post another 10-15mm. This still gives good power to pedal but also allows some freedom of movement which is important on an mtb.
Seat Tilt
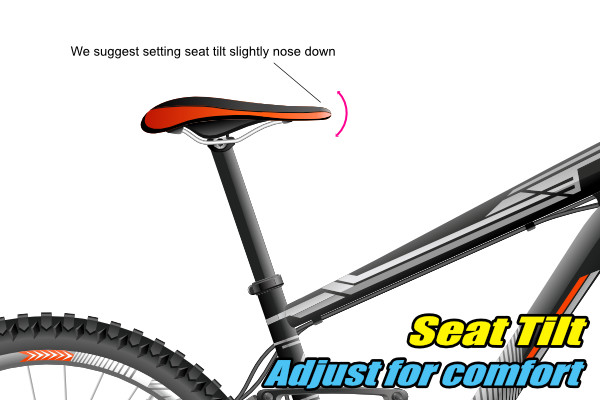
We suggest you tilt the seat so the nose of the seat is just lower than level. You only need a couple of degrees so you don’t feel like you are sliding forward. A small tilt will help reduce pressure to any sensitive body bits you have down there. As we are all built differently down there, you may need to experiment a bit to get this right. Be sure to make small adjustments and test ride.
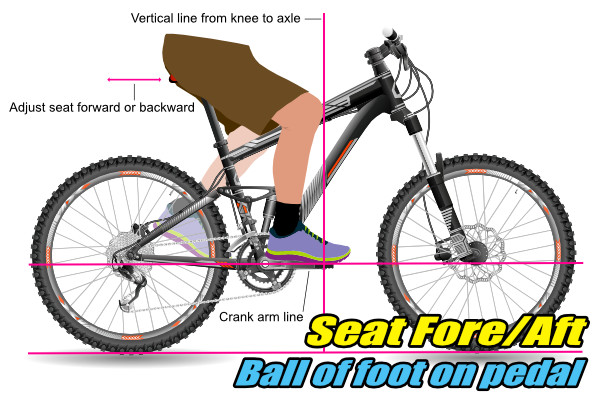
Seat forward/aft position
The seat can slide forward and back on the seat post. This is to help you get the relationship between your pedals and your knees/legs correct for the best control and power transfer. When your foot is on the pedal, and the pedals are at 3 and 9 ‘o’clock, you should be able to hang a weight off your knee cap and it would hang right over the pedal axle and ball of your foot.
No substitute
Again though, this is no substitute for a professional bike fit. The right bike setup when you are starting out can help you not only avoid injury but also maximise your effort on the bike. However, if you simply can’t afford to get a pro bike fit done, or find one in your area then hopefully this will help.