
Going Tubeless
The pro and cons and how to actually go tubeless
Most of you will have heard about running tubeless tyres on your mountain bike. Many of you will have a good idea about to actually make the switch to a tubeless tyre set up. However, many of you will not be sure how to go about it, or if it’s even worth the trouble. In this article we’ll have a decent look at the world of tubeless and see if we can help you understand the process, the advantages of going tubeless and even the reasons to stay using tubes.
Pros
Let’s look right at both sides of the decision. Here’s the brief reasons why going tubeless is a good idea.
- Fewer flats – When using tubes, you can’t go too low in tyre pressure on an mtb due to rocks, roots etc causing enough impact on a tyre that it distorts, then lifts, and allows the tube to poke a little between the tyre and rim to create a pinch flat (sometimes called a snake bite). You know you have had this happen because when you pull the punctured tube out you will see two, tell-tale holes. These are a very common puncture in mountain biking. By virtue of no tube to pinch, going tubeless means no more pinch flats ever.
- Better traction – By virtue of no tube to pinch, going tubeless allows you to run lower air pressures, which in turn, allows for the tyre to spread out more at the point it meets the dirt. This extra ‘footprint’, as it’s called, allows more tyre and its knobby tread to grip the ground, creating more traction in corners and even during climbing or descending. See our article on tyre pressures for more information on how tyres perform depending on tyre air pressure.
- Less weight – this is actually debatable. At first look, you save weight by not having a tube. However, you are going to add sealant, probably 100 – 200 mls which is around the weight of a tube anyhow. And unless you choose a light tubeless tyre, you may even run a heavier tyre than you were before due to some tubeless tyres having thicker, strengthened sidewalls (known as UST) to help avoid cuts too big for sealant to fill. However, these days many tyres follow the newer style such as Tubeless Ready (TLR) which have normal sidewall design relying on the sealant within to keep them inflated. This often keeps the weight to respectable levels.
- Softer ride – Less air in your tyres also means a softer ride over the bumps. Not so important on a dual suspension bike (although still very noticeable), but definitely noticeable on a hardtail bike with only front suspension.
- Smoother & better rolling – This is something we hear people describe from time to time, and have to admit, whenever we’ve ridden with tubes and then changed back to tubeless, we believe we’ve noticed it also. Especially on wider tyres. It’s argued that a tube inside a wheel creates its own friction and upsets the balance of the wheel. Whether that’s strictly accurate or not, a tubeless set up does seem to roll with less friction. Maybe it’s just in the mind.
Cons
There are some drawbacks to going tubeless.
- More expense – Cheaper mountain bikes don’t come with wheels and tyres that are tubeless compatible. Therefore, to get a new bike that’s waiting for you to add sealant and go tubeless, you’ll need to buy a more expensive bike. If you already have a bike you are happy with, but it doesn’t have tubeless compatible wheels, you’ll need a conversion kit or new wheels.
- New wheels or conversion needed – If you are upgrading your wheels from standard non-tubeless type (rims for tyres that need tubes), you’ll find most new tubeless compatible wheels or rims are good to high quality. A good thing, but not usually cheap. Conversion kits are reasonably cheap (under $100) but we do hear of mixed results on cheaper ones. In the end, though many people have no issues with them, it’s obviously less risk to have proper tubeless compatible wheels than to use a conversion kit that could be a compromise depending on the quality of kit and type of rim on your wheels.
- More difficult to change tyres – When it comes time to change your tyres, it’s no longer just a matter of letting the air out of the tube, popping off one tyre, popping on another and then re-inflating the tube. Now you have to let the air out, take one tyre off, put another on, put in sealant, re-inflate, rotate the wheel so sealant gets into any leaks, leave overnight, re-inflate and possibly keep riding and re-inflating for a few days until it all settles in.
- More mess – For some, not an issue. However you do get sealant spills from initial leaks and the inside of a tubeless tyre you take off is likely to have old sealant in it, so that’s a bit yucky. Any mess is easily wiped up though.
- You need an air compressor – Although some people have managed to get tubeless tyres to seat on the rim properly with just a good floor pump, not all tyres will be so kind. There’s really no denying that having an air compressor makes the job a whole lot easier. However, even a cheap air compressor, hose, fittings and a tyre inflator are going to cost a couple of hundred bucks or more. However, having been on tubeless for more than a decade, I wouldn’t bother without an air compressor. You could also use a CO2 kit to rapidly inflate a tubeless tyre but we’ll stick with the compressor. You can see what a CO2 kit is in this article on packing for a ride.
So then, fewer flats and better traction are very convincing reasons to go tubeless. Both are huge advantages over tubes. I can think of only about 2 punctures that forced me to pull a tube out to get home since going tubeless in well over 10 years. There may be more but the point is, they are so few and far between, I don’t remember many. It’s just a matter of weighing up the costs against your own budget and ability to handle maintaining a tubeless tyre set up and whether you think going tubeless is something you can deal with. Personally, I’d hate to go back to tubes myself.
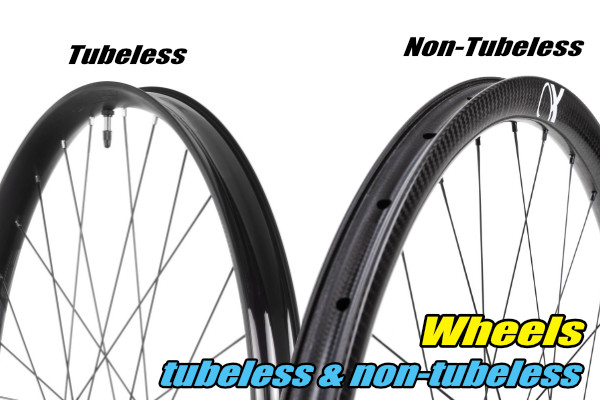
What is a tubeless wheel?
In case you are unfamiliar with the difference between a normal mtb wheel and a tubeless compatible mtb wheel; it’s in the design of the wheel rim. Let’s look at the difference.
Normal rim
A normal rim is designed to take a standard tyre & tube. The rim usually has a series of holes right through it for the spokes (or spoke adjustment) and one hole for the valve and then a rubber or similar tape that covers the holes so they can’t cut the inner tube. The tube itself then is the air tight chamber used to inflate the tyre so to speak.
Tubeless rim
A tubeless rim differs from a normal rim in that it has no visible holes on the tyre side of the rim. This forms a smooth surface broken only by the valve hole. A tubeless valve has a rubber base that seals this hole once installed. Once the tyre is fitted, an air tight chamber is created by the tyre and rim; no tube needed.
Note: Many wheels are sold as “tubeless compatible” or “tubeless ready” and come with, or require tubeless rim tape to seal the spoke holes. These are not specific tubeless wheels but are usually still a reliable option.
What’s the difference between tubeless & standard tyres?
Although similar to look at, there are some definite differences between a tubeless compatible tyre and a standard tyre. A standard tyre doesn’t need to be an air tight unit in itself because the tube does that job. Therefore, many standard tyres have poor air tight qualities. Many tubeless tyres, on the other hand, have good air tight qualities because they are an integral part of the air tight chamber in a tubeless system. Another characteristic of a tubeless tyre is the bead. The bead is the where the tyre hooks onto or retains itself against the rim. In order to encourage an air tight seal, tubeless tyres tend to be smooth in this area whereas a standard tyre often have ridges to aid in grip.
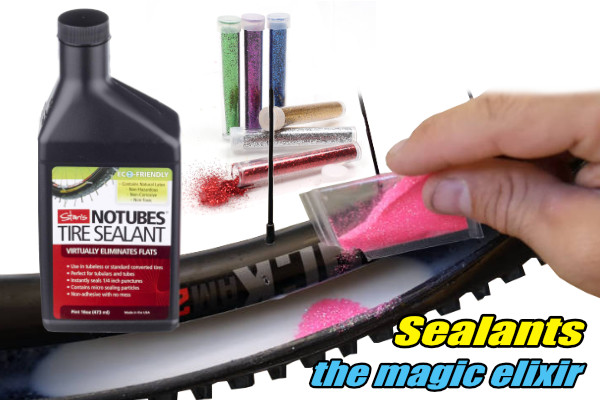
What is this “sealant” you speak of?
Commercial MTB tyre sealants are usually a liquid latex mixture with small particles added. The small particles help to clog the punctures and the liquid latex seal around it.
There are many brands available of sealant and we’ve seen many reviews and comparison test done on many. We don’t usually mention or recommend particular brands in our articles if we can avoid it. We prefer not to be held responsible if someone doesn’t agree with, or have a similar, positive experience with a product that we have. However, we will risk it with sealants as we’ve found Stans No Tubes sealant has always preformed well for us and also seems to come out at, or near the top of, most tests we’ve read.
Tip: Some people (including us), add a gram or so of party glitter to the tyre when we put in our sealant. Some tests have shown this appears to increase the sealant’s ability to seal larger holes.
Note: Sealant will dry out after a few months of use. It can also become contaminated by water from intrusion or condensation. Therefore it is recommended that you change your sealant every 3 months or so.
What happens if I have a tubeless puncture?
Quite often, you’ll never know you even had a puncture. It’s true. Many punctures are very small and the sealant quickly seals these up as you ride.
Occasionally though you’ll get a beauty of a puncture which announces itself in a spray of sealant. Because the puncture hole is larger than normal the tyre pressure forces sealant out without sealing. Try stopping, letting some pressure out of the tyre and rotating the tyre so the puncture hole is at the bottom against the ground. Sit down and relax for ten minutes and enjoy your surroundings so the sealant has some time to work. Hopefully, if your sealant choice is good, and the hole isn’t too large, it will seal up given time.
If the hole is too large, or is actually a tear in the tyre and the sealant simply can’t seal it up, you will need to fit a tube to continue.
How to set up a tyre as tubeless
Ok then, you’ve made the decision to go tubeless and you want to do it and continue to maintain the tubeless system yourself. Good for you. Let’s start by looking at what you’ll need to do the job and then how to go about it.
You’ll need
- Tubeless wheels or a tubeless conversion kit.
- Tubeless valves.
- Tubeless tyres.
- MTB tyre sealant.
- Tyre levers.
- Air compressor, hose and tyre inflator.
- Schrader to Presta adaptor (if the tyre inflator isn’t Presta valve compatible).
- Floor pump with gauge.
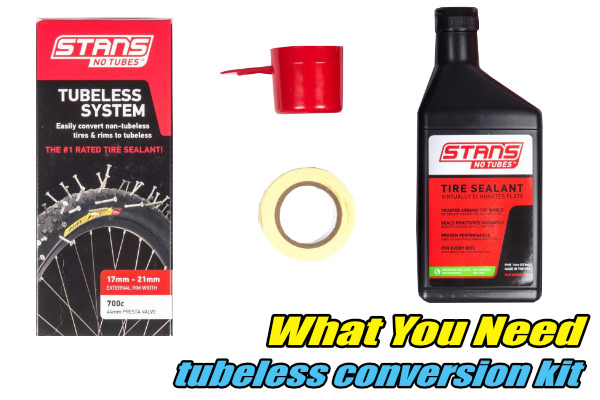
Tubeless wheels or conversion kits
We’ve already covered these options above so we don’t need to go on to much on this. As mentioned, more expensive bikes in many brands come with tubeless wheels and tyres fitted (with inner tubes though). You usually get the tubeless valves in the owners kit also. If you purchase tubeless wheels and tyres later, then you’ll need to also purchase tubeless valves to suit your wheels.
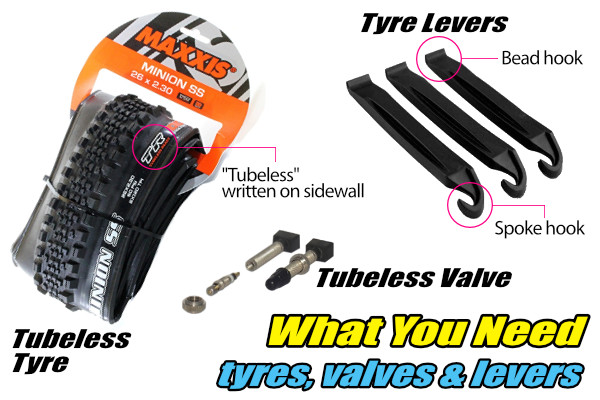
Tubeless tyres
Again, we’ve covered this above, however we will mentioned a couple of points not yet covered.
Firstly, just something to remember, air permeates through the rubber of both tubes and tyres. The process, called permeation, is the molecules of air passing through the rubber and escaping. It’s why you need to check the air pressure in your tyres very regularly. We suggest every few days and no longer than a fortnight.
Secondly, it is possible to use some standard (non-tubeless compatible) mtb tyres. However, while you might save some money on the tyres, you will likely find they won’t pop into place on the wheel rim as easily, they will suffer greater permeation (you know what that is now), and will likely have many more micro leaks to deal with when first installed until the sealant has had time (sometimes days or longer) to finally seal everything up. Proper tubeless tyres are much easier to deal with.
Thirdly, original tubeless tyres were designed to be used without sealant. Known as UST (Universal Standard Tubeless) they debuted back in 1999 and are heavily built to resist punctures. Everyone I’ve ever known who have used UST tyres uses sealant also. Later versions of tubeless tyres such as Bontrager’s Tubeless Ready (TLR) tyres are designed to be used with sealant as they are not made heavier and stronger than standard, non-tubeless tyres.
Tyre levers
Tyre levers are small tools to help you pry your tyre off the wheel rim. They come in many different styles. Some are better suited to road tyres while others are great for mtb tyres. Look for tyre levers that are made from stiff plastic and a bead hook at one end and a spoke hook on the other. The bead hook is for getting under the bead of the tyre and hooking it up over the rim. The spoke hook is so once you’ve done that, you can hook the tyre lever on a spoke to hold the lever in place while you grab another and repeat the procedure.
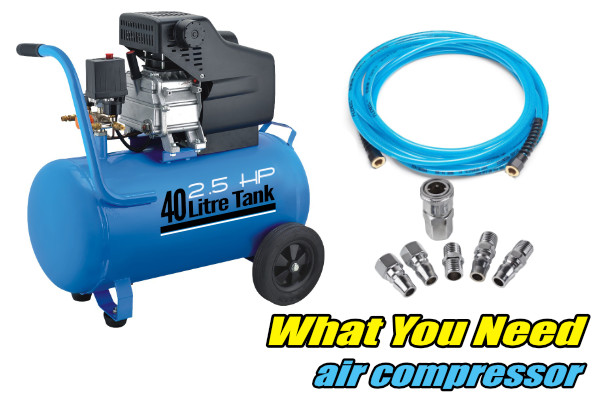
Air Compressor, hose & tyre inflator
Fairly certain most people know what an air compressor is. They can be handy tools to have around. No more trying to find a service station with a decent tyre inflator; you can have one at home! Get a blower fitting also and you can blow clean all sorts of bike parts and other things around the home.
As mentioned above, you don’t have to go and buy a top quality air compressor for tubeless tyre fitting, unless you want to of course. Far be it from us to suggest people only buy cheap stuff. But for those who can’t afford to, or don’t see the need to buy top shelf in this case, those air compressors from auto parts stores for less than $200 will do the job just fine. However, if they do come with a hose and fittings, they are going to be crap and probably leak and even blow off with the slightest of pressure. Therefore, we do suggest if you buy a cheap compressor, don’t skimp too much on the hose and fittings.
At the time of writing, we had bought a cheap compressor a couple of years ago, a cheapish hose and fittings but did at least spend good money on a Jamec Pem brand tyre inflator with gauge. We do suggest you get a good quality tyre inflator as cheap ones not only have inaccurate gauges, they tend to leak past the triggers and fittings.
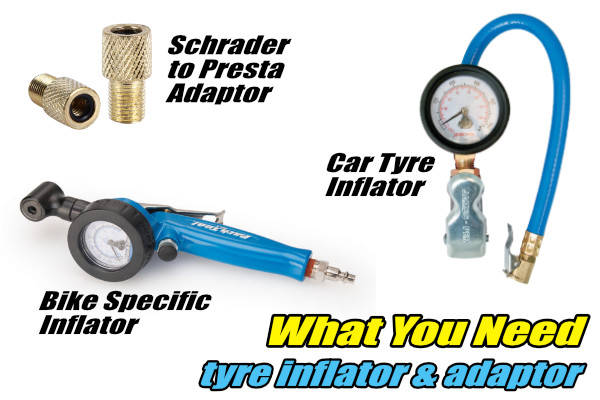
Schrader to Presta Adaptor
If you do like we did and buy a tyre inflator that suits car valves (because we wanted to use it easily for checking the car’s tyres), you’ll need an adaptor. This is because mtb tubeless valves are Presta whereas your car’s valves are Schrader. The adaptor is usually as simple as a brass fitting that screws onto your tubeless valve and is a normal car valve (Schrader) on the other end.
An alternative is to buy a specific Presta, bike valve style tyre inflator with gauge, they are available.
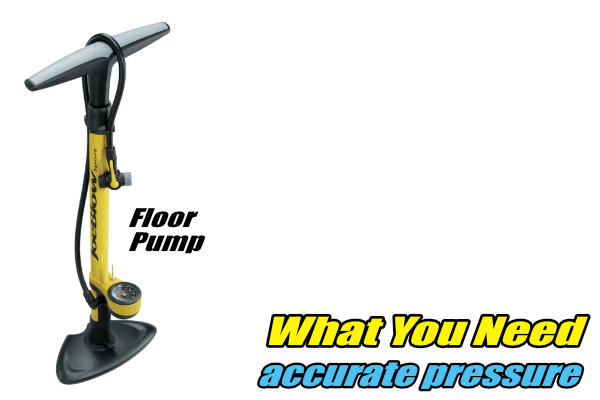
Floor Pump
I’m sure you’ve all seen these, a bike pump that stands upright on the floor with a ‘T’ handle and gauge. You’ll need one so you can accurately adjust the air pressure in the tyre after you’ve finished the tubeless set up. Frankly, we wouldn’t be without at least one regardless. We have one at home and another one lives in the car.
Tubeless set up
For this you obviously already have, or have bought, tubeless compatible wheels, tyres and valves.
- Remove your tyre and tube from the wheel rim.
- Push the tubeless valve through the hole from the inside of the rim so the rubber base sits nicely against the valve hole. Tighten the valve up from the spoke side of the rim using the collar/nut supplied.
- Take a suitable tubeless ready tyre and fit one side to the wheel rim. Be sure to remember to look for the rotation direction arrow and fit tyre accordingly.
- Partially fit the second side of the tyre, leaving enough open to pour in sealant.
- Shake sealant very well! Pour in required sealant. We recommend something around 100 – 200 mL depending on how wide your tyre is.
Note: Some people recommend removing the valve core and syringing the sealant through that. - Finish fitting second side of tyre to wheel rim.
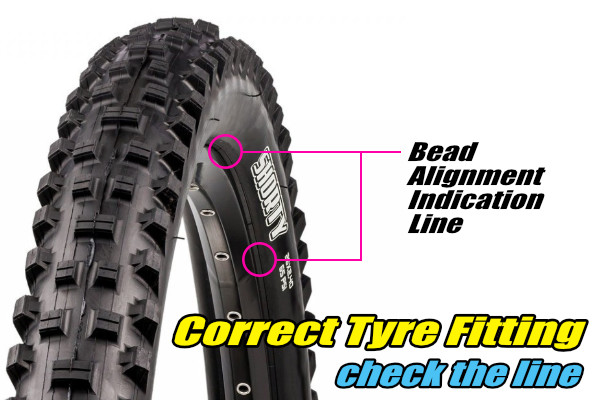
- Inflate tyre as quickly as possible (an air compressor is often needed) until the tyre beads well (pops properly onto the wheel rim). Most tyres (standard and tubeless) have a narrow, bead alignment line that runs around the tyre (just above where the wheel rim is) to show if it’s correctly beaded. See image below. The line should be even around the tyre in relation to the wheel rim. You may need plenty of air pressure in the tyre to achieve a good bead. It’s not uncommon to need 40 PSI or more. Pre-lubing the rim with some sealant or a small amount of soapy water is a big help.
You may see sealant leaking out around the bead and even small bubbles here and there around the tyre. This is normal as most tyres do not achieve perfect air tightness on every rim. The sealant is doing it’s job. - Adjust the tyre pressure now to around 25 PSI or less and rotate the tyre around in your hands to swish the sealant to every internal surface of the tyre. Too much pressure will simply force the sealant out if there’s a decent leak anywhere. Lower pressure pushes the sealant into the leak and gives it a chance to seal up properly.
- Hopefully, if everything went perfectly, you are done. We do suggest though, leaving the tyre overnight and occasionally rotating it around if possible. Don’t be discouraged if the pressure has dropped overnight. Simply re-inflate to your riding pressure and go ride. Take a pump in case, but most likely it will survive and sort itself out.
Using a kit
Ok, so you have standard wheels and at this point can’t afford or don’t want to fork out for new tubeless wheels. Fair enough, your current wheels might be awesome in every other way so why spend loads on tubeless wheels when a conversion kit will do the trick?!
Obviously the first thing to do is read the instructions that come with the kit. However, they’ll likely tell you something like the following.
- Remove your tyre and tube from the wheel rim.
- Clean the inside of the wheel rim well. Make sure it’s clean and dry before continuing.
- Apply the rim tape, taking care to get a good seal all the way around.
- Find the valve hole and carefully cut a small hole for the tubeless valve to pass through.
- Push the tubeless valve through the hole from the inside of the rim so the rubber base sits on the rim tape. Tighten the valve up from the spoke side of the rim using the collar/nut supplied.
From here you simply follow the tubeless set up steps 3 through 9.
We hope this helps those who were unsure if they could handle going tubeless to have the confidence to go for it.