Choosing Your Next MTB Tyres
What mtb tyres should I use? This is a question that is not only common for beginners, but many of us ask ourselves this question most of our riding lives. Often, we just guess and try lots of different tyres trying to find that perfect tyre or tyre combination. Does it even exist? Perhaps it’s an ever changing answer? Why your friend is faster through the turns might be lots of reasons; it might just be a better tyre choice too.
In this article, we will look at various aspects of mtb tyres to help you understand what you are looking at when you look at tyres. We’ll talk about how they are constructed, different tread types and how they might suit different riding types or riding surfaces. Hopefully this will help you to understand why one tyre is more expensive than another and figure out which tyre is your best choice. Finally, for those not wanting to deal with so many factors in their decision to buy new tyres, we’ll simplify it down to the absolute basics.
Construction
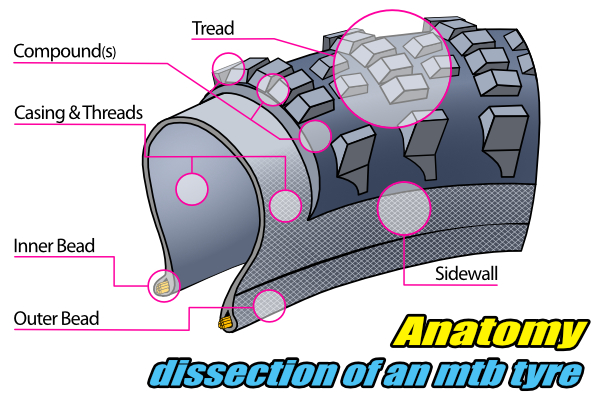
It’s easy to just think of a tyre as a hollow rubber tube with some knobs on it. However, that sort of basic thinking will not help you understand how to choose the best tyre(s) for your bike. Each tyre is constructed with various features and elements according to its intended design purpose and quality.
Casing
Under the visible rubber is the casing of the tyre. This is the framework of the tyre and is constructed with layers of nylon (or similar) threads coated with rubber. Each layer is often referred to as a “Ply” and many tyres have 3 plies. These thread layers/plies are woven in various ways depending on tyre and brand to create the inner, flexible carcass of the tyre. You’ll often see the term TPI (threads per inch) or EPI (Ends per inch) used in the descriptions for tyres. A higher TPI/EPI count means the tyre carcass has more threads than a lower TPI/EPI count obviously, but it also means the threads are finer as well. This helps to make the tyre more supple and lighter, which allows the tyre to deform to the terrain well, however the finer threads offer less puncture protection. The lower TPI/EPI tyres have much more coarse threads and more rubber coating them. This adds weight but also durability, stiffness and stability.
Which is better then? Depends what you need the tyre for. A lightweight cross country race bike will usually have the lighter, high TPI/EPI tyres rather than the lower TPI/EPI tyres more common on all mountain/trail bikes. This is because the racers often favour a lower weight for going up hill fast and sprinting along the flat sections over grip going down hill.
What’s a high or low TPI/EPI? TPI/EPI of up over 120 is very high. Around 50 – 70 is average. Under 40 and it’s a very low TPI/EPI found on the chunkier, heavier trail or downhill tyres.
Note: You will sometimes see the TPI/EPI count listed up at around 200. This is usually because there are multiple layers (plies) of threads. For instance, 3 plies of 60 TPI/EPI may be shown as 180 TPI/EPI.
Bead
The tyre’s bead is where the tyre meets the wheel rim. The bead grips the rim to stop the tyre from falling off. Cheaper tyres use a steel wire inside the bead. These tyres can not be folded. Well, not if you want to use them again anyhow. Better tyres use a strong but flexible cord of kevlar or similar to reduce weight and allow the tyres to be folded for storage.
Sidewalls
The sidewalls are self explanatory really. They are the area between the bead and the tread. Sidewall construction can have a large bearing on the weight of a tyre, but also the way the tyre feels. Thickness and layer construction in the sidewall both have effects on weight, stiffness and strength. Some tyres have little in the way of sidewall layers, whereas some have advanced layers of kevlar or similar to aid in puncture/tear resistance. Advanced sidewall layering may add some weight to the tyre but it also allows for lower tyre pressures. You can read much more on tyre pressures in our Newbies Guide Mtb To Tyre Pressures so we won’t go into detail here.
Compound
Rubber ain’t rubber I’m afraid. Just like racing cars, bike rubber comes in various rubber compounds to provide different levels of grip and durability. Some tyres even use dual or triple compounds to achieve different levels of grip and durability across a single tyre. For example, a tyre may use a hard compound for the tread in the centre, where most wear will occur, but then use a softer compound on the outside for better grip when leaning into a turn. Multiple compound tyres will usually be more expensive than single compound tyres, but obviously offer more specific levels of grip and longevity in the different areas of tread depending on each part of the tread’s use. While a softer compound provides more grip, it also tends to roll slower, and wear out more quickly, than a harder compound tyre.
You may not find any reference to the actual compound softness on the tyre. You will often need to look at the manufacturers specs for the durometer rating. The durometer scale is the measure of a compound’s softness. In mtb tyres, a durometer of 70 is a hard compound. A durometer of 40 is very soft. For cross country and trail riding purposes a durometer around 50 – 60 is probably the best compromise between grip and longevity.
Tread
Again, I think most riders will know what tread is. However, the term tread is really a general term to describe the overall tread pattern of knobs of the tyre. In truth though, many tyres are designed and built with different elements to their tread patterns. We’ll look closer at tread and how to choose it further down.
Width & Weight
For cross country and trail riding, there is a wide variety of tyre widths on offer. From the weight weeny cross country racer using 1.8 – 2.2 inch through to the all mountain, go anywhere trail riders using anything from 2.1 through to about 2.5 inch. Recently, some manufacturers have released trail mtb bikes capable of using tyres as wide as 2.8 – 3.0 inch. For the purposes of this article we are going to concentrate more on the standard cross country/trail bikes so we are talking about tyres within the 1.8 to 2.5 inch range.
So then, wider is better?
Not necessarily. In general terms, a narrow tyre will be lighter and roll faster on hard surfaces. With less air volume, they will need a higher air pressure in them than a wider tyre to protect against pinch flats and rim strikes from rocks etc if you aren’t set up tubeless. Read about going tubeless in our Going Tubeless article. Some race courses and trails are well suited to a narrow tyre, especially if you are wanting more speed on the climbs and better acceleration out of the corners. However, a wider tyre puts more rubber tread onto the trail, especially seeing as you can run a lower air pressure due to more air volume. Of course these features, while increasing grip, also increase rolling resistance and weight. This makes the wider tyre slower to accelerate. However, with the increased weight comes a stronger gyroscopic effect of the turning wheel which increases stability at speed. The downside now is the heavier tyre becomes more resistant to turning and stopping than a lighter tyre. The disparity between light and fast and then soft and grippy is very noticeable between a 1.8 inch tyre and 2.5 inch tyre even if they are a similar tread pattern. Finding the right compromise for your bike and your riding becomes the challenge.
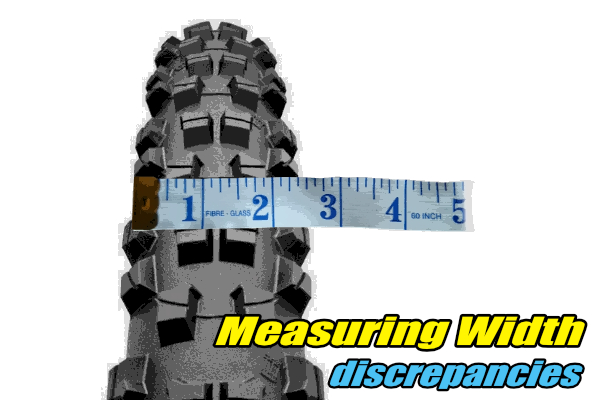
Sizing & Measuring Discrepancies
The tyre size is expressed in inches. The size of your mtb tyres are written on the sidewalls and will look see something like 27.5 x 2.3. If you have a 29 inch bike then it would be 29 x 2.3 or 26 x 2.3 on a 26 inch bike. The 27.5, 29 or 26 obviously refers to the overall wheel and tyre size. This is measured across the full diameter when the tyre is inflated. The width will clearly be the other number and usually one of these… 1.8, 1.9, 2.0, 2.1, 2.2, 2.3, 2.4, 2.5 inches.
Not all manufacturers measure their tyre widths exactly the same. In other words, one brand’s 2.3 inch might be a bit wider than another brand’s 2.3 inch tyre. The discrepancy usually arises from one brand measuring the widest point between the outside knobs of their tyre, and another brand measuring the widest point of the tyre casing/sidewall. On some tyres, the knobs will protrude out wider than the tyre casing. This is important because you have a limited amount of space between your fork legs and the chain stays/frame at the rear, to not only fit a tyre into, but also allow for a buckle or any build up of mud etc.
Tread In-depth
Direction & Knob Design
Quite often a tyre needs to be mounted on the wheel rim so the tyre rolls in its intended direction. This is because the tread pattern has been designed with knobs that work best when rolled forward and not so much backward. This is achieved with the shape and angle of the knobs as well as the pattern they form. An arrow (usually with the word “Rotation”) will be found on the sidewall of the tyre to help you put it on so it rolls forward in the right direction.
Knob height is also a factor. A tyre more suited to loose, wet or even muddy conditions will tend to have higher knobs than a light cross country race orientated tyre. These large knobs of the tyre suited to loose conditions will bite into the dirt well but may tend to feel a bit spongy on a hard surface as the tyre moves on the knobs.
Note: Because the intended design of a tyre is affected by the height of the tread’s knobs, a tyre will obviously provide its best performance when new. Most riders expect a tyre to perform to its full potential until it’s well and truly worn down. However, when you understand that a tyre’s knobs are designed to dig into, or spread and grip onto, the surface it was designed for, allowing your tyres to wear down even below half way and still expect them to perform properly is unrealistic in many cases.
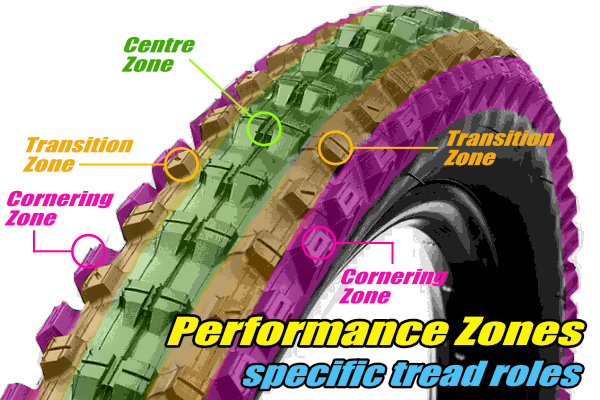
Performance Zones & Profile
With mtb tyres we talk about 3 specific performance zones of a tread. The centre zone, the transition zone and the cornering zone. How much each of these zones differ from each other will depend on the tyre’s overall design and tread pattern. For instance, a tyre designed for a hard surface will usually have lots of smaller knobs when compared to a tyre for soft or loose surfaces. These smaller knobs may not differ much across the tyre’s width. Also, the profile of the tyre may be quite rounded to allow the tyre to lean into a turn without any real change in feel or grip level. A tyre for a soft, loose surface however will have larger knobs and the size, shape and spacing of the knobs could be radically different across the performance zones. The soft or loose tyre’s profile may not be as rounded as a hard surface tyre either. It may be quite square shouldered so there is a noticeable difference in the feel of the tyre as it rolls over into a turn. This is to help drive the bigger cornering knobs into the ground.
Centre Zone
The centre zone is for when the bike is upright. This is where the tyre will spend most of it’s time so a softer compound here will give great grip but wear out quickly. A medium to hard compound is usually preferred in the centre zone. On harder surfaces the centre zone will affect your rolling resistance depending on the tread pattern.
Transition Zone
The transition zone is where a leaning bike starts to rely on the outside knobs. For a skilled rider, the transition zone is a momentary need as they roll the bike over to aggressively attack a corner on the outside knobs of the cornering zone. A more sedate rider however may hardly ever go past the transition zone into the cornering zone at all. Some transition zones have many knobs and tend to be more forgiving, at least on harder surfaces. However, a more aggressive tyre for loose surfaces may have a transition zone that is sparse with, or even devoid of, knobs giving a moment of uncertainty before the cornering zone takes over. This style makes for a more aggressive cornering zone that doesn’t compete with the transition zone knobs when hard cornering.
Cornering Zone
The cornering zone is where the bike is leaning well into the turn and no longer using the centre zone much, if at all. You’ll usually be at speed (in relation to the turn at least) and forces on the tyre through the turn are high. Grip is paramount to stop you sliding out so a soft compound is handy here.
Tread Patterns & Their Application
In the simplest of terms, when you look at a tyre’s tread pattern, it will probably be of one of three appearances. Small and closely packed knobs, big and chunky knobs with big gaps between them or something in between those two with medium sized knobs and medium sized spaces between them.
Although below we’ve broken the tyre types down into 4 categories, there are so many different designs out there, many fall across more than one categories. Our intent here is to stick to the commonly seen designs for the most common surface types. Understanding these 4 types of tyre will help you to adapt your knowledge when you see a tyre that seems to not fit these categories perfectly.
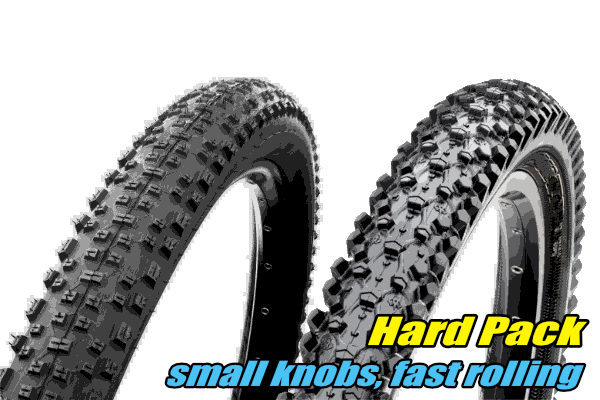
Hard Pack/Loose Over Hard Pack
A hard pack surface is something very well compacted when dry. Think of concrete hard dirt. Loose over hard pack refers to a hard pack surface with a loose, shallow cover of something more slippery, like small rocks/gravel. A tyre suited to this surface will have a lot of small knobs closely packed together in it’s centre zone. The knobs are usually not very high (deep). On the hard surface, the tyre uses many knobs to grip the surface. On loose over hard pack surfaces, the small knobs are designed to reach down to the hard surface for grip. The compound will often be reasonably hard/ medium hard in order to stop the hard surface from wearing the tyre out too quickly. The cornering zone may feature slightly bigger knobs. On the hard surface, this design is fast rolling and responsive. Grip is high on hard surfaces but not great on anything soft.
If you also use your MTB for a lot of commuting on cement paths or bitumen roads as well as in the bush, then this type of tyre might be your best choice.
Note: We haven’t mentioned wet conditions for hard pack. This is because it’s really quite impossible to generalise on how a tyre will perform on a wet, hard pack surface. Some hard pack surfaces in the dry become slick, almost clay like when wet. There’s not much that will grip well in those conditions unless the deeper knobs of a loose/wet tyre can dig through enough.
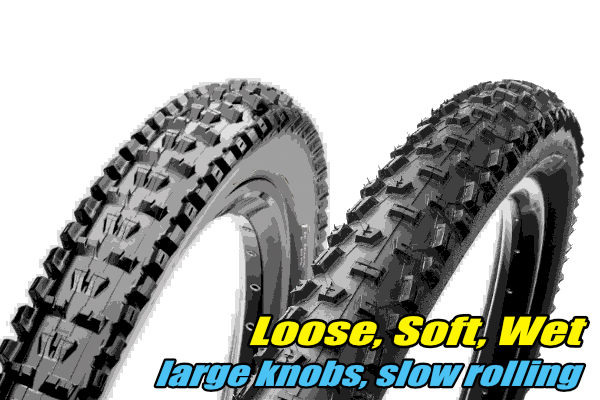
Loose, Soft & Wet
A tyre for a soft, loose surface will have larger, deeper knobs more sparsely placed. This is to allow the knobs to bite into the dirt, and to allow the dirt to flick clear without compacting into the gaps. Compounds may range from medium to soft to ensure good grip over long wear. This design of tread pattern won’t tend to roll quickly on hard surfaces at all but will still grip well on them. It will even offer a reasonable level grip in mud if it’s not too clingy and simply clogs the tyre’s tread up. Tyres in this range are often heavier and therefore, in conjunction with an open tread pattern, are a good choice for rocky terrains also.
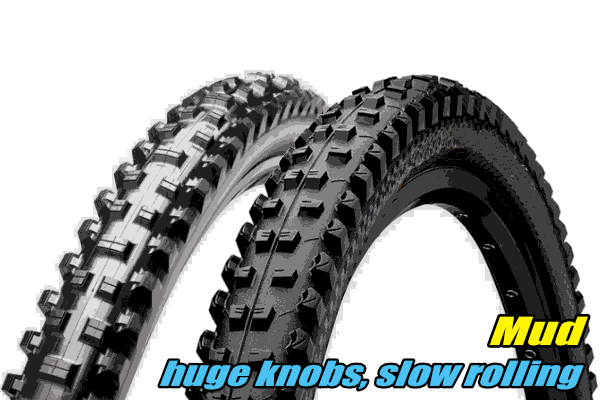
Mud
Mud tyres will have very large, deep knobs spaced well apart. Being able to dig deep into the mud and not get clogged up is the goal of the design. These are slow rolling tyres on most surfaces other than in soft, wet and muddy conditions. Compounds used are usually on the soft end of the scale. These tyres do not perform well on hard pack because the height of the knobs allows the bike to squirm around and feel very spongy and uncomfortable. However, they can do well in rocky terrain.
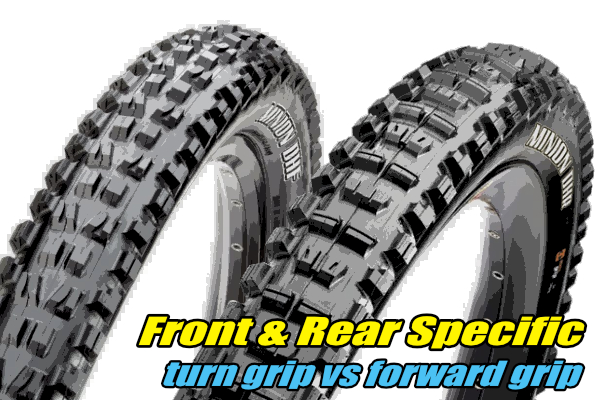
Front & Rear Specific MTB Tyres
Many tyre manufacturers offer mtb tyres specifically designed to fit each end of your bike. Some even have a particular model of tyre that comes in a front and a rear version. In other words, the pair of tyres of the same model will be 1x front tyre and 1x rear. Either way, these specific tyres are designed to perform best when fitted to the wheel they are intended to go on.
Note: Although they are designed to perform best on a particular wheel (front or rear), this doesn’t mean you can’t use them on the wheel they weren’t intended for. Feel free to experiment if you wish.
Front Specific vs Rear Specific
Often, a front specific tyre will utilise angles and shapes of knobs to get the best out of the cornering conditions (dry hard pack/wet and soft etc) it’s designed for. It doesn’t compromise on a knob design that better suits a rear tyre. It’s about turning into the cornering and then maintaining the grip of a leaning bike. Forward grip is less important.
A rear specific tyre may (not always) be slightly more narrow than its front counterpart and utilise a more aggressive, horizontal knob pattern, designed to grip in a forward motion as opposed a turning action of a front tyre. It may still have good cornering grip when leaning but the centre knobs are designed for forward grip, not to allow better steering.
Mixing & Matching Brands or Models
There’s absolutely no reason why you can’t use mtb tyres from different manufacturers or use different models of tyres from one manufacturer. In fact, it’s very common to do just that. Some riders like to have different widths or tread patterns front and rear, whereas others prefer to have the same pattern. Neither way is necessarily right or wrong. It’s a personal choice. Some riders can afford (and be bothered) to have several sets of tyres to suit various locations and conditions. Most of us either can’t afford, or simply can’t be bothered to go changing tyres around on a regular basis. Therefore, we need to match our tyre choice to our most common type of trail and style of riding.
Simplifying the choice
Ok, for those who have simply skipped down here or those simply still confused on how to choose your next tyres, let’s try to melt it down and just deal with the basics.
So then, your tyres are wearing out, or perhaps you’ve bought a new bike and have decided the tyres on it just aren’t up to the tasks you ask of them. You need a pair of tyres that will do everything you need.
What questions do you ask yourself when deciding what mtb tyres to get next? Refer to the images of tyre tyres above and consider the questions below.
Making The Decision
- What types of riding are you doing? How aggressively do you ride? Cater for the most aggressive riding you do. You will want the best grip you can when you are riding at the limits of your skills or simply going quickly.
- What types of trail surfaces/conditions do you usually ride? Decide which is the most important to you. For instance, do you simply take it easy on the rougher stuff because you usually ride easier trails and maybe commute on bike paths a lot? Then a hard pack tyre might be the best choice for you. Or, do you make sure you can ride hard in the rough and loose conditions and simply put up with having to pedal harder due to a slower rolling tyre? A loose/soft surface tyre might be the best choice in this case.
- Do you think your current tyres are grippy enough or not grippy enough? No point changing tyre type if your current tyres are doing the job you ask of them. If they aren’t however, assess what you currently have… hard pack with tots of small knobs… fast rolling and good on hard surfaces. Or soft/loose, less and bigger knobs… slower rolling but good for loose and wet surfaces.
- What size are your current tyres? Do you want to go wider or narrower? If you’ve read all above and our tyre pressure article, you’ll know going wider not only helps with grip but also comfort. However, it also means they will roll slower than narrower tyres on harder surfaces. However, you may already have sufficiently wide tyres and it’s just a tread change you really need.
- Does your bike allow for wider tyres? Look carefully at the gaps between the tyres you have and the forks and also the rear of the bike frame. No point pointing on tyres that will rub the moment they get some dirt or mud on them.
Failing all that… ask someone who knows your riding ability and current learning rate well. If you are in our coaching programs, our coaches may be your best source. Perhaps you have a friend who has many years of experience who can help?
For most riders who are still finding their way in MTB, and really feeling a bit lost on it all still, we’d suggest looking for something in the loose/wet or loose over hard pack surface range with a width of around 2.3 inch. This type of tyre will provide the widest compromise for most cross country style of riding. It should grip well in most situations and be big enough to allow lower tyre pressures than a narrower tyre, giving a more comfortable ride. It may be a bit slower on those cement bike paths though. But hey, grip in the dirt over speed on cement right?!
We hope that helps.