How wide should your handlebars be?
Back in the day, handlebars for cross country (XC) riding were much more narrow than we tend to see today. They were also mostly flat bars, and then after several years we saw the ‘rise’ of the riser bar, a handlebar with as much as several centimetres of upward curve. Now, XC bikes are purchased with a range of handlebars but for most decent bikes, a slight riser bar at widths between about 650 – 760mm seems to be common although some still use flat bars also. However, people come in many different sizes too, so in this article we’ll examine whether you should consider changing your handlebar width and how you might choose a good width for you.
Why is width important?
Handlebars are primarily a device to turn the bicycle, however, it’s worth noting that the design (including the width) has a bearing on other factors as well.
Stability
First and probably foremost, a wider bar is about stability. Not just for actually cornering the bike, but also to maintain control over bumps and at speed. Even very slow speed stability can be affected by your handlebars’ width.
Think of it this way. If you stand with your feet together, you have very little stability and it doesn’t take much to topple you sideways or even backwards from a little outside input, such as a push from a friend. Spread your feet just a little and suddenly stability is increased. Spread them out to about shoulder width and your stability becomes very good. Keep moving out though, and there comes a point where your stability is compromised. You may be hard to push sideways now, but a butterfly’s fart will knock you backwards.
On the bike then, handlebar width affects how easily outside inputs, such as bumps, rocks, ruts, roots and hippopotamuses affect your steering. Ok, not hippos, just making sure you’re concentrating again and not wondering what a butterfly’s fart smells or sounds like. Roses and a baby’s sigh by the way. Back to the topic though, these external trail inputs push your front wheel to the side and disturb your steering. With narrow bars, and therefore less stability, these inputs have a greater effect than with a wider bar which provides more leverage.
Breathing
When the terrain gets a bit tough and your lungs are starting to struggle, wider bars assist you to breathe easier than narrow bars. This is because with your arms away from your torso, your lungs can expand without restriction which is evident when a narrower bar forces your arms in to your sides.
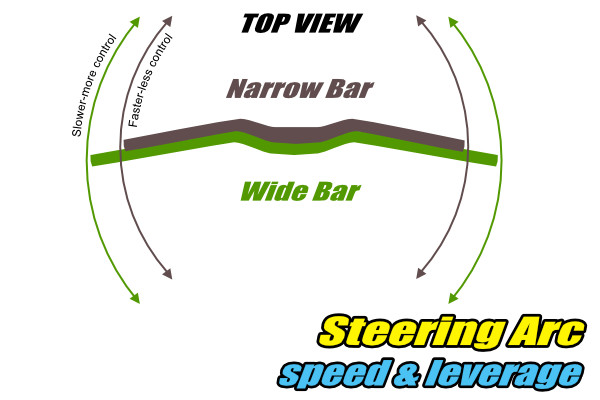
Steering speed
Your steering speed is affected by your handlebar’s steering arc. This is the arc that your handlebars travel as you turn. If your bars are very narrow, the travel is shorter than if your bars were wider. This makes steering with narrow bars much faster (think twitchy) than wider bars, which, if too wide for you, makes your steering slow (think lazy).
Body position
Mountain biking requires the rider to change body position often and sometimes quite rapidly. Again bar width can have a bearing on your body’s manoeuvrability. If your bars are too wide for you, you will find it harder to get your body back far enough for those steep descents or drops. Too narrow though and when you are back there, you’ll have little control over your steering. Some advanced cornering skills require more aggressive body positioning and a wider bar allows for this.
Doesn’t my bike just come with the right width bars?
Not necessarily. Many brands will have the same width handlebar on all sizes of the bike in a particular model. For example, if a cross country model in a brand has a 760mm handlebar on it’s large frame, the small framed bike in the same model will also have the same 760mm handlebar. In this example, would a small rider on a small frame need 760mm bars? Even some riders on large frames may choose to go more narrow than 760mm. Therefore, it’s likely that adjusting the bar width is a viable option for some riders.
Same size riders, different bike use
Two riders may use the same model of bike in different ways. This may mean a different handlebar width is best for each rider. Lets say our two riders are the same size and both have identical bikes. However, rider 1 just rides for fun on the occasional cruise around easy trails, while rider 2 rides a lot on both cross country trails and also races in gravity enduro events. The best handlebar width for each of these riders may differ due to the disparity between the relaxed riding of rider 1 and the aggressive riding required by rider 2.
One rider, two bikes
Another reason why the original handlebar width might not be the best choice is when a rider has a bike for a specific purpose. Many riders have more than one bike. It’s not uncommon for someone to have a nice light, short travel race bike of maybe 90 – 110mm travel and also a long travel bike of 130 – 160mm travel. This rider may usually ride the short travel bike in tight, cross country trails and races and therefore prefer a narrower handlebar so the steering is quicker and they don’t get caught up in the trees. They will definitely want much wider handlebars on their long travel bike though if it’s main purpose is the fast, open trails of a gravity enduro track. Same rider, same size bikes but different riding disciplines dictating different bikes with different bar widths.
Confused yet? Don’t worry, we’ll try to give you some recommendations of widths for you further down.
How Do I Decide on the best width for me?
Riding style
Back in the day, a cross country rider was a cross country rider. A downhill rider was a downhill rider. A cross country rider back then was someone who had a reasonably light bike and tended to enjoy climbing mountains as much as riding back down them. They raced in both short, sprint races as well as long bike marathons or even endurance events like 12 and 24 hour races. Downhill riders raced on steep, very technical tracks with big jumps, massive bermed corners and nasty rock gardens. These days however, cross country riders regularly also compete in gravity enduro events which are a kind of blending of both cross country and downhill racing. Essentially gravity enduro is a day of timed downhill races but includes untimed climbs the riders must do. All of this completed within a specified time limit. The gravity enduro trails tend to be built for speed and have plenty of small jumps, bermed corners and other technical features like rock gardens but not as crazy as a full -on downhill track.
The handlebar width that best suits you personally may be one that takes into account the type of riding you do.
Your body
As we mentioned earlier, it is certainly possible to have handlebars that are too wide. If you are small or short in stature, and ride a small framed mtb, then a “wide bar” for you isn’t going to be as wide (in millimetres) as a wide bar for someone larger who rides a large framed bike.
Summary
So then, when deciding on your ideal handlebar width, you should take into account the style of riding you do, the types of trails you usually ride, and what suits your own body size.
Rule of thumb
It’s important to note that you, personally, need to be comfortable with your handlebar width. You may have prior restrictions in movement due to injuries or diseases and conditions such as Rheumatoid Arthritis. You need to be happy with your choice.
It’s also important to realise that there really isn’t any specific standard set as the best handlebar width for any particular size of bike/person or riding discipline. It truly is a personal choice. However, after many years of experience, and many years of talking to others and research, the following seems to be at least a basic guide to what is considered wide. There are always exceptions to the rule though.
Note: We recommend never getting a new bike and immediately cutting down your handlebars. Because wider (though not too wide as discussed earlier) is more stable, ride your bike for several decent rides on various trail networks before you choose to cut them shorter.
Small XC/Trail bikes
650 – 700mm.
Medium XC/Trail bikes
680 – 730mm.
Large XC/Trail bikes
730 – 760mm.
XLarge XC/Trail bikes
750 – 780mm.
For gravity enduro riding you may choose to go even wider than our recommendations here. It wouldn’t be unreasonable to add another 20 – 40mm of overall width for instance.
Cutting down a handlebar
Cutting down a handlebar isn’t a complex job. Here’s the basic math and how to go about it depending on whether you have aluminium or carbon bars.
The math
Decide on your overall width you want and minus that off the current handlebar width. For example, if you want your bar width to be 730mm but your bar is 760mm then obviously you need 30mm off. Simply cut 15mm off each end. You’d have figured that out yourself we’re sure.
You’ll need
- Hacksaw (with fine tooth blade)
- Pipe Cutter (optional for aluminium bars instead of hacksaw)
- Masking tape
- Sharp knife (for carbon bars)
- Ballpoint pen
- De-burr tool (optional)
- Metal files & sandpaper
Hacksaw – A hacksaw with a fine tooth (something around 24 TPI or more) blade suitable for metals will deal with both aluminium and carbon. Cut lightly when cutting carbon.
Pipe Cutter – We wouldn’t recommend these for carbon bars but we wouldn’t be without them for aluminium. At around $10 – $15, you get a perfectly straight cut every time. To use, simply wind the cutting wheel down onto your cut mark with enough pressure that the tool is stiff but easily turned around the handlebar. Make sure the dual idler wheels/rollers are both on the handlebar on the opposite side from the cutting wheel. Move it around the handlebar a few turns, until you can feel it has loosened up a little. Wind in a bit more pressure and repeat. Do this until you are through the bar. The idler wheels/rollers ensure the tool stays plump to the cut.
Masking tape – Just normal masking tape is fine. It provides a little protection for the handlebar in case you slip with the hacksaw, as well as a surface to easily make a clear mark with a pen. When cutting carbon bars, the masking tape also aids in preventing chips as you cut.
Sharp Knife – This is to score the carbon before you start cutting. To score means to cut through the outer layer right around the handlebar. This helps prevents the carbon chipping when hacksawing through the bar for a cleaner cut and less filing and sanding afterward.
Ballpoint pen – A normal ballpoint pen is perfect to mark your cut line on the masking tape.
File & Sandpaper – After cutting an aluminium handlebar, you’ll need to file both the outside and inside the handlebar where you made the cut. A small, fine flat, metal file for the outside, and a small round, metal file for the inside. You could also use a de-burring tool for the inside which saves getting a file in there. Maybe sandpaper also afterwards. A carbon bar may only need sandpapering afterward.
Aluminium Bars
- Remove or loosen and push in all levers etc on the handlebar so you have room to make your cuts.
- Roughly work out where your cuts are needed and wrap masking tape around the handlebar one layer thick, but cover about 30-40mm (15-20mm either side of where you expect to cut).
- Measure in from the end where you need to cut and use a pen to mark. This would be 15mm in using our example above. If using a hacksaw, make several marks around the bar at this measurement. If using a pipe cutter, one mark will do.
- Cut away. If using a pipe cutter, see above for usage instruction. If using a hacksaw, carefully cut through taking care to keep as straight as possible.
Carbon Bars
- Remove or loosen and push in all levers etc on the handlebar so you have room to make your cuts.
- Roughly work out where your cuts are needed and wrap masking tape around the handlebar one layer thick and wide.
- Measure in from the end where you need to cut and use a pen to mark. This would be 15mm in using our example above. If using a hacksaw, make several marks around the bar at this measurement.
- Gently, using a sharp knife, score all the around the handlebar.
- Carefully cut through with your hacksaw taking care to keep as straight as possible.
Safe steering
That about covers all we want to mention. Hopefully, even though handlebars seem like nothing more than tube of aluminium or carbon, you’ve learnt how important they are to your stability, breathing and safety as well as steering.
Hope that helps.